
If you run Microsoft Dynamics 365 Business Central across multiple locations, you can plan in a supply chain order using the reverse planning worksheet. You plan transfer orders first, then production orders, and finally purchase orders, working backwards from supply to demand.
You set this up with planning templates. Each template runs one step, and a “next template” field links the templates together so they run as an iteration through the low-level codes.
You cannot filter on the replenishment system “Transfer Order” using the item card. That field only exists on the stockkeeping unit card. You solve this by combining an item filter template with a stockkeeping unit filter template in the planning template.
In practice, you usually do not run one big iteration. You run one step at a time, check the numbers against your capacity and demand, carry out that step, and move on.
Planning across multiple locations in a supply chain order
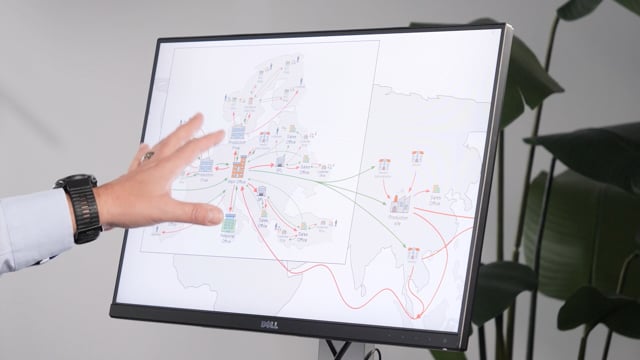
When you have a setup with more than one location, you typically have a main office, manufacturing sites around the world, and sales offices or sales hubs. In that situation you want to plan in a supply chain order, meaning you plan backwards from supply to demand.
That usually means you plan the transfer orders first on the different locations, transferring from your production location, main location, or distribution location. Then you work backwards from there.
In the example here, you are a planner sitting on the production location. From there you plan transfer orders for all the surrounding locations, then production orders on your main location, and finally purchase orders on that main location. If you were a planner on one of the other locations instead, you would plan that location first, both production orders and transfer orders, depending on how that location works.
Using planning templates for reverse planning in Business Central
In Business Central you can do this from the simple MRP. You can plan manually by creating templates or setting filters: first transfer orders, then production orders, then purchase orders. Or you can use the predefined templates.
Be aware of one important limitation. You cannot filter on replenishment system “Transfer Order” on the item card, because that field only exists on the stockkeeping unit card.
Combining item filter and stockkeeping unit filter templates
To work around this, the planning template has both a stockkeeping unit filter template and an item filter template. It works in two steps. First it takes the item filter template and only plans on the items within that template. Then it applies the stockkeeping unit filter template on top.
In the example, the template is a full run for transfer orders to safety stock. The item filter template, called “transfer items”, is defined by the location you want to transfer in from. It could also be a location code different from your production location.
The stockkeeping unit filter template says that the replenishment system must be “Transfer” only. That way it only brings in the stockkeeping units with that replenishment system.
Running templates in iteration through low-level codes
You can plan on all low-level codes by running one iteration, putting the result into the reverse planning worksheet, and repeating. You can also plan with a “next template”, so you define other templates and plan down into those.
If you look at the template list, you have a list of templates you can run one after the other: transfer orders first, then production order on level zero, production order on level one, and so on, ending with purchase orders. The name of each template tells you the order it runs in.
On the right-hand side, each template points to the next template to run. First transfer orders, then production orders on level zero, then production orders on level one, and so on. It is an iteration, and for each template you set up manually whether it triggers on safety stock or reorder point, and what to include of demand and supply.
You can also make hidden templates. You check the column when you choose “show hidden templates” and edit the view to define whether a template is hidden. This is only about keeping the overview clean.
Setting up automatic batch jobs for planning
Before you run the planning, check that you do not already have lines in your reverse planning worksheet. If everything is set up and you have many items, you can run this as an automatic batch job. Set it to run at night so the planning is done when you arrive in the morning.
When you run it on your production location, it plans only transfer orders on the surrounding locations, then production orders on your production location, and finally purchase orders on your production location. The result lands in the reverse planning worksheet.
For the lines to transfer directly from the simple MRP into the reverse planning worksheet and break down the low-level codes, you check the options to suggest all quantity automatically and carry out. Otherwise it would not break down the low-level code.
How the reverse planning worksheet creates component demand
In the worksheet you see transfer orders to all your different locations first, for example an external location and Copenhagen. Then production orders on your main location, and finally purchase orders on your main location. This makes it easier to overview.
The reason for running it in iteration and putting it directly into the journal is the component demand. When you click a production order line, it needs to create the component lines in the journal, which is the dependent demand further down the low-level code hierarchy. A transfer order line has no component line, but a production order line does.
This is what the MRP journal normally does automatically. Here it is a little more manual.
Why you plan one step at a time in real life
In real life you usually would not do one big iteration like this. You do one step at a time. You take the transfer order to safety stock in a manual journal, carry that out into the reverse planning worksheet, then plan production orders on level zero. You look at the numbers, check whether they fit your capacity and demands, then carry out, and continue.
This gives you a clean and controlled way to plan across multiple locations.
Q&A
Why can’t I filter on the replenishment system Transfer Order from the item card?
The replenishment system “Transfer Order” only exists on the stockkeeping unit card, not on the item card. To filter on it, you combine an item filter template with a stockkeeping unit filter template in the planning template. The item filter template selects the items, and the stockkeeping unit filter template applies the transfer replenishment system on top.
In what order should I plan when using multiple locations?
You plan in a supply chain order, working backwards from supply to demand. You plan transfer orders first on the different locations, then production orders on your main location, and finally purchase orders on your main location.
How do I link planning templates so they run in sequence?
Each template has a “next template” field. You set the next template to run in the chain: transfer orders, production order level zero, production order level one, and so on, ending with purchase orders. This makes the planning run as an iteration through the low-level codes.
What settings do I need so lines break down low-level codes into the reverse planning worksheet?
You check the options to suggest all quantity automatically and carry out. Without these, the planning does not break down the low-level code and does not transfer the lines into the reverse planning worksheet.
Can I run this planning automatically overnight?
Yes. If you have many items and your setup is stable, you can set the planning up as a batch job that runs at night, so it is finished when you arrive in the morning.
Should I run all steps in one big iteration?
Usually not. In real life you do one step at a time. You carry out the transfer orders to safety stock, then plan production orders on level zero, check the numbers against your capacity and demand, carry out, and continue step by step.