
In Microsoft Dynamics 365 Business Central, Routing Link Codes let you tie a specific component from your Bill of Material (BOM) to a specific operation in your Routing. The result is that the component’s due date follows the operation where it is actually used, rather than being required at the very start of production.
You set this up by defining a Routing Link Code, attaching it to an operation on the Routing, and then attaching the same code to the matching component on the BOM. When you create a production order, the components without a Routing Link Code get the start date as their due date, while the linked components get the due date of their operation.
This means you avoid having components in stock too early. If an operation runs two days into a production order, the component for that operation is only due two days in, not on day one.
What Routing Link Codes do in Business Central
A Routing Link Code connects a component in your Bill of Material to a specific operation in your Routing. The purpose is to postpone the demand, or due date, for that component so you don’t have to keep it in stock too early.
Without a Routing Link Code, every component on a production order is required at the start of production. With a Routing Link Code, the component’s due date is pushed to the date of the operation it belongs to.
Here’s a practical example. Imagine you build bikes. Components like the rim, spokes, socket front and front hub are used in operation 10, your first operation. You could assign them a Routing Link Code, but if it’s the first operation it isn’t strictly necessary, since those components are needed right away anyway. The tire, on the other hand, is used in operation 20. By giving the tire its own Routing Link Code, its due date moves to operation 20 instead of operation 10.
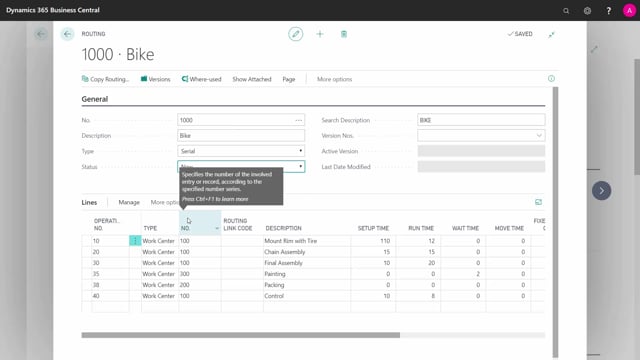
How to set up Routing Link Codes
Start by defining your Routing Link Codes. You can name them whatever you want. A practical approach is to call them 10, 20, 30 and so on, matching the operation numbers, so it’s easy to see which code belongs to which operation. The name itself has no technical meaning, so you could just as well use A, B and C. The point is that the code links a component to an operation, not that the name matches anything.
Next, attach the code on the Routing side. Open your Routings, select the Routing you want, and change the status so you can edit it. In the Routing Link Code field on the relevant operation, for example the final assembly, set the code you want to use, such as B. Remember to certify your Routing again when you’re done.
Then attach the same code on the BOM side. Open the matching Bill of Material and find the components you want to link to that operation. For example, set the lamp, item number 1500, with Routing Link Code B. You can add more items the same way, such as a mudguard front with its own Routing Link Code. Remember to certify the BOM when you’re finished.
At this point the components are tied to the corresponding operation through the shared Routing Link Code.
How it works on a production order
To see the effect, create a Firm Planned Production Order on an item that uses the BOM and Routing you set up. Add a quantity, for example 20 pieces. This is the standard way of creating a production order.
When you look at the components on the production order, the due dates show the difference. Most components share the same due date, for example the 17th of July, which is the production start. The two components you assigned a Routing Link Code to have a later due date, for example the 19th of July. If you check the Routing, you’ll see that this later date matches the due time for that operation.
Q&A
What is a Routing Link Code in Business Central?
A Routing Link Code is a code that ties a specific component from the Bill of Material to a specific operation in the Routing. It makes the component’s due date follow the operation where it is used.
Why would you use a Routing Link Code?
You use it to postpone the demand for a component so you don’t have to keep it in stock too early. Instead of being required at the start of production, the component is only due when its operation runs.
Do you need a Routing Link Code on the first operation?
Not necessarily. Components used in the first operation are needed right away, so their due date is already the production start date. A Routing Link Code mainly matters for operations that run later in the production process.
How do you name Routing Link Codes?
You can name them anything. A practical approach is to use the operation numbers, such as 10, 20 and 30, so it’s easy to see which code belongs to which operation. The name has no technical meaning.
Where do you attach a Routing Link Code?
You attach it in two places: in the Routing Link Code field on the relevant operation in the Routing, and on the matching component in the Bill of Material. The same code must be used in both places. Remember to certify both the Routing and the BOM afterwards.
How can you see the effect of a Routing Link Code?
Create a Firm Planned Production Order and look at the components. Components without a Routing Link Code get the production start date as their due date. Components with a Routing Link Code get the due date of their assigned operation, which is later.