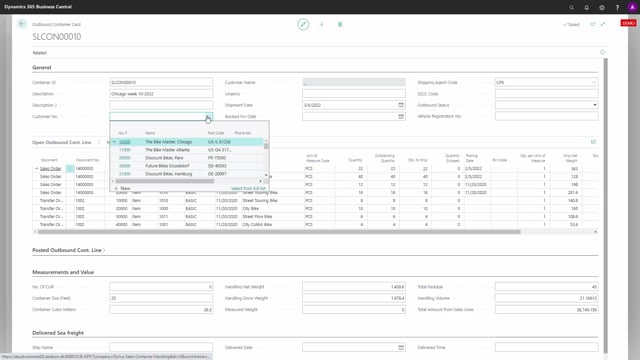
Let’s take a small overview of the fields on the sales container to create an overall understanding.
First of all, in the header, we had the container ID, which follows a number series that will be filled in automatically normally in description and description two, you can write whatever free text you would like on the container.
If the container is for only one customer, you can add a customer number from the customer list and thereby, import lines based on that customer.
So if it’s for a single customer, you use this field. In this specific container, I can see that I have different customers and also a transfer order and therefore, the customer number is deleted.
In the urgency field, it’s actually a free text field where you can write whatever you want to just to see it in the overview if it’s urgent what you’re going to do with this container.
The shipment date can be maintained in the header and if you do that, it will ask if you want to update all the sales order and transfer order line with this date. So it’s a way of update all the lines in one go. Booked for date is normally filled in when order the container so we have a date when you will expect the container to arrive on your ramp. So you can follow up if it’s not being there on time.
The shipping agent code is of course the shipping agent that are supposed to ship the container. and the serial number container code, you can fill in here, which is the 18 digit number which is specific for this specific container, outbound status will be filled in more or less automatically.
So if you ordered, for instance, you will fill in manually, but when you ship it, it will set it to shipped. So some of them are automatically and this is of course just the stasus field that you want to view on the container to make sure or to see it in the container list.
If the container is a truck or something with a registration number, you can enter it in here. So for instance, if you have your own trucks that you use for shipping, you can also plan on which truck is driving on which states.
Then you have the lines that are added to the container and the posted lines that are added to container, posted on the container.
Further down, you have the measurements which is all about the measurements of this container and some of it is calculated automatically or could be calculated automatically from the calculate content and value function.
Some of it is added manually, for instance, the container size is something you add manually. The number of colli is added manually. Container cubic meters is added manually if you want to do that and some of it is measured or calculated.
And in the lower section, we have information if you deliver on sea, you might want to know the ship name and what date it’s delivered in harbor or what time it is expected to be delivered in harbor.
Often, we see that our customers would like to leave the container or send it to the harbor and then wait there for further handling.
So these are the base information on the container card.

