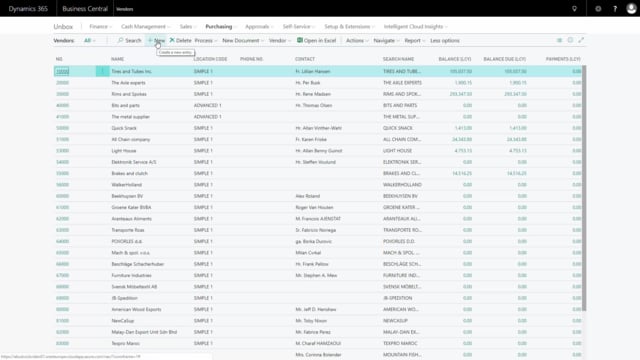

Creating a new vendor in Microsoft Dynamics 365 Business Central is a quick process. You start from the Purchasing menu, open the vendor list, and select New. You can assign a vendor number manually or let a number series do it automatically.
You must fill out the vendor posting group, general business posting group, and VAT registration number on the Invoicing tab before you can post anything on the vendor. If you leave these fields empty, Business Central will not let you post transactions.
You can leave most other fields blank and fill them in later, for example when you receive the first invoice from the vendor.
Creating a new vendor from the vendor list
To create a new vendor in Business Central, go to the main menu and open Purchasing, then the vendor list. In the vendor list, select New to create the vendor. You can either type in a number you define yourself, or pick a number series that assigns the number automatically.
In this example, the vendor is called The Alu Expert. You can also assign a purchaser code from your list of purchasers.
Entering address and contact information
On the address, you enter the vendor’s address. If you know the zip code and it is set up in your system, Business Central automatically fills in the city and region code for you.
For the contact, you have two options. You can use the contact table, or you can select a specific contact directly. Once you have selected a contact, you can add details such as phone number, email, and the webpage if you have that information. If not, you can add these details later.
The language code matters for documents, so it is worth setting it from the start. In this example, the language is set to English.
Filling out the Invoicing tab
The Invoicing tab holds the fields that are required before you can post on the vendor. If you do not fill them out, you cannot post anything on this vendor, so enter what you know right now.
The relevant fields include:
- VAT registration number
- General business posting group, if you know it
- Vendor posting group, for example a foreign vendor
- Currency code
Setting payment terms and method
On the Payment tab, you select the payment terms code, for example 10 days, and a payment method code, which could be Account Foreign. You can leave the remaining payment details until you receive the first invoice from the vendor, since that document gives you the information you need.
Setting up receiving details
On the Receiving tab, you select the default location where you receive goods from this vendor. You can also set the shipping method code, for example Free on Board.
Once these fields are filled in, the vendor is ready and you can start creating purchase orders.
Q&A
Where do you create a new vendor in Business Central?
Go to the main menu, open Purchasing, then open the vendor list and select New.
How do you assign a vendor number in Business Central?
You can either type in a number you define yourself, or select a number series that assigns the number automatically.
Which fields are required before you can post on a vendor?
You need to fill out the fields on the Invoicing tab, including the VAT registration number, the general business posting group, and the vendor posting group. If you leave these empty, you cannot post anything on the vendor.
Does Business Central fill in the city automatically?
Yes. If you enter a zip code that is set up in your system, Business Central automatically selects the city and region code.
Can you create a vendor without filling in every field?
Yes. You only need the required Invoicing fields to post. You can fill in the rest later, for example when you receive the first invoice from the vendor.