
Personalization in Business Central lets you tailor pages to match the way you work. You can add or hide columns on a list, rearrange them, set freeze panes, and adjust how fields appear on a card. The changes apply only to your own view, and you control them entirely from the user interface without any development work.
You start personalizing under Setup, Personalize. From there you choose to personalize pages, and you can move from a list straight into a card while staying in edit mode. When you are finished, you press Done and your changes stay in place.
On a list you add a field through the Fields option, then drag it to where you want it. You can widen or narrow columns, hide fields, move columns, and set a freeze pane so chosen columns stay visible while you scroll right.
On a card you can add fields, control whether a field shows by default or only under Show more, and decide which fields stay visible when a tab is collapsed.
How to start personalizing pages in Business Central
You begin under Setup, Personalize. This gives you the option to personalize pages. Press View more to go into the page you want to change, for example the Items list.
While you are in personalization mode, you are not limited to a single page. If you want to edit the item card as well, you can go into the card directly from the list and still be in edit mode. That way you adjust both the list and the card in one go.
Adding and removing columns on a list
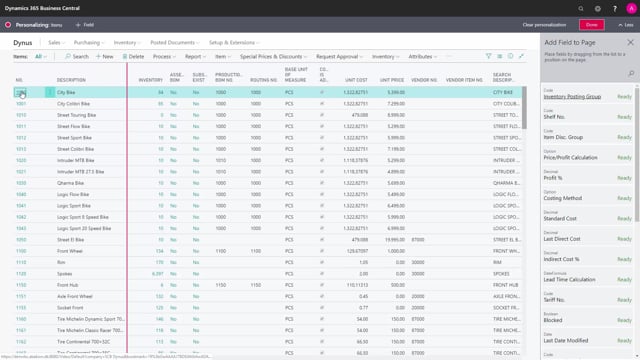
To add a new column to a list, press Fields. You then see the full list of fields available for that page. To add the vendor item number to the Items list, you mark the field and drag it onto the page. A red line shows you where the field will land, and you drop it there to place it.
To hide a field, click the red triangle on the column and select Hide. The column disappears from your view.
Adjusting column width and position
You can make a column wider or narrower by dragging its edge. To move a column to another position, mark it, click on it, drag it to the new spot, and let go.
Setting a freeze pane on a list
The red vertical line on a list is the freeze pane. Columns to the left of this line stay fixed even when you scroll to the right. To change where the freeze pane sits, click the red triangle on a column and select Set Freeze Pane. After that, fields such as Number and Description always stay visible in the list, even when you scroll out to the right.
Personalizing fields on a card
You can add fields to a card the same way you do on a list. The available fields appear on the right-hand side. On a card there are usually fewer fields left to add, since most are already on the page, but you still mark the field, click and drag, then drop it where you want it to appear.
Cards give you a few extra options. A field that is promoted shows on the tab by default. If you do not want to see a field such as Type unless Show more is selected, you set it to Show under Show more. The field is then hidden in the normal view but appears again when you click Show more. You can also set a field to Show always, so it remains visible whether you choose Show less or Show more.
Controlling what appears when a tab is collapsed
When you collapse a tab, only certain information stays visible. For example, you might see only the quantity in PCS by default. If you also want the description shown when the tab is collapsed, you set the field to Show when Collapsed. After that, collapsing the tab shows both the description and the unit of measure.
Saving your personalization
When you have made all the changes you want, press Done. Your personalization is then in place and applies to your own view of the pages.
Q&A
Where do I start personalizing pages in Business Central?
You start under Setup, Personalize. Choose to personalize pages, then press View more to open the page you want to change.
How do I add a new column to a list?
Press Fields, find the field you want in the list, then mark it and drag it onto the page. A red line shows where it will be placed.
How do I hide a field on a list?
Click the red triangle on the column and select Hide.
What does the freeze pane do?
The freeze pane keeps the columns to its left visible while you scroll to the right. You set it by clicking the red triangle on a column and selecting Set Freeze Pane.
How do I move a column to another position?
Mark the column, click on it, drag it to the new position, and let go.
Can I personalize a card and a list at the same time?
Yes. While you are in personalization mode on a list, you can open the related card and stay in edit mode, so you adjust both in one session.
How do I control whether a field appears by default or only under Show more?
Set the field to Show under Show more to hide it in the normal view, or to Show always so it stays visible regardless of Show less or Show more.
How do I keep a field visible when a tab is collapsed?
Set the field to Show when Collapsed. The field then stays visible even after you collapse the tab.
How do I save my personalization?
Press Done when you are finished. Your changes are saved and applied to your view.
This gives me the option to personalize pages.
Press ‘View more’, and we go into Items.
On this list, I would like to add a new column.
I do this by pressing Fields.
I now see the long list of fields that I can add to this page.
I want to add the vendor item number to my list.
I mark the field, and I drag it.
By placing it with the red line, I can place it.
I can make the column wider or smaller by dragging it.
If I want to hide a field, I can do this by clicking on the red triangle and selecting ‘Hide’.
The red line here is the freeze panel, saying that this field will always be the same even though I scroll out.
I can change this by again clicking on the red triangle and selecting ‘Set Freeze Pane’.
Now I will always, in this list, see Number and Description even if I scroll out to the right.
To move a column to another position, mark it, click on it and drag it and let go.
When you have done all the personalization you want on the list, you can click on Done.
But you don’t need to stop here.
If I also want to edit the item card, I can simply go into the card from here and still be in my edit mode.
On the card, we can also add fields.
You can see this on the right-hand side.
There are not that many fields not already added to the page, but it will still require us to mark it, click on the mouse, and drag and drop, where we would like the field to appear.
We have a few other options on the card.
Right now, our item tab is showing what’s been promoted.
If you don’t want to see the Type when we have not selected ‘Show more’, we can say this: Show under Show more, so now the field has been removed when we just look at it, but if we say ‘Show more’, the type will show again.
And we can go back to ‘Show always’ and if we say ‘Show less’, the field will now again be shown.
When we collapse tabs, we can right now see that PCS is the only information that we can see.
I would also like to have the description shown, and I can do this by ‘Show when Collapsed’, so now, when I collapse the field, we both see the description and the unit of measure.
When I’m done with all my personalization, I simply press Done.
And my Personalization will be in place.