Playlists Manage
Log in to create a playlist or see your existing playlists.
Log inSo we’re going to look into how to set up the intercompany partner, and look at some of the possibilities you have there with the intercompany app.
This is what happens in the video
So I’m here right now in my supply company and find my intercompany partner.
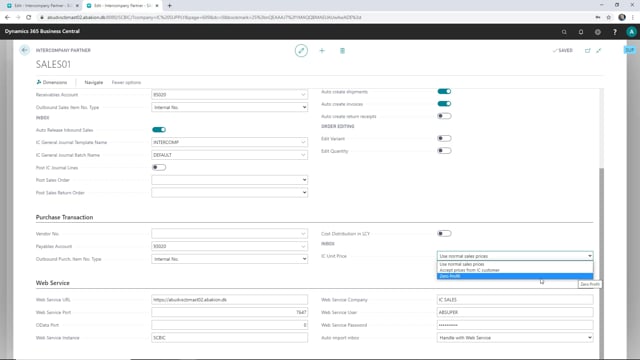
So this is the intercompany partner for the sales company, and there’s a lot of extra setup possibility here in the intercompany app, but also you’ll find the standard intercompany setups. So first we have the intercompany partner code, and the name.
You can specify a currency code, and choose the transfer type for your transactions, this could be file location, database, email, or just no intercompany transfer.
With the intercompany app, you can checkmark this transfer type web service, and when you choose this you don’t need to set up the company name because this will be set up in the web service part.
Also, there’s the ultra accept transactions, and this is also not required when you use the web service, and you can block your intercompany partner.
Here we have the setups for the sales transactions. We have our customer number, this is the number for the intercompany partner, this is our sales company.
There’s the receivable account you can set up, and you can set up is there should be outbound sales item number type. So here you can define should we use our internal number, or common item number, or across references.
There will be another video on how to set this up.
You can auto release outbound sales, and then we have some fields here some that are extra for the intercompany app.
If you are working with intercompany journals, then you can define here as default what should be the journal template name and the batch name, and then you can set up if any of the posting should be done automatically.
If you check mark this, then when the intercompany journal lines are created, they are posted immediately.
Also you can set up if you would like to post any sales orders that are created, and you can set up here if there should be no setup or should only post the shipment, or should both post the ship and invoice, and you can do the same for the return order.
You can activate here the auto create shipments, and auto create invoices, auto create return receipts, and here you can specify if the Supply Company should be allowed to edit or change quantity of variants on a sales order.
So when a sales order is created from the sales company, should the Supply company be allowed to change quantity of variant, you activate this here.
If we scroll down here, we have some things regarding the purchase transaction, here you can set up a vendor order number, if you also have intercompany vendor here, the payable accounts, and again, we have the outbound purchase item number type, here again, you can set up if it should be just the internal number, the common item number, cross references, or the vendor item number.
You can set the cost distribution up here, and here you can define how the prices should be used in your supply company.
If you check this one use normal sales prices, then the sales prices in your supply company will be used.
If you check this one accept prices from your IC customer, then the prices from your sales company will be transferred and used on your supply company sales order, on the IC partner in your sales company there you can define which prices should be used and transferred.
And then we have the last one here zero profit, when this is checked then the unit price in the supply company will be used.
At the end here, we have the web service setup, and here you define how the web service should be in the intercompany. We have another video on this one.

