
Cross-reference numbers in Microsoft Dynamics 365 Business Central let you and your customers order items using their own item numbers instead of yours. When you set up a customer’s item number on the item card, the translation between your numbering and theirs happens automatically on the sales line, and it works in both directions.
To see cross-reference numbers on a sales order, you first need to make the Cross-Reference No. column visible on the item lines. You do this by right-clicking the header and choosing Columns.
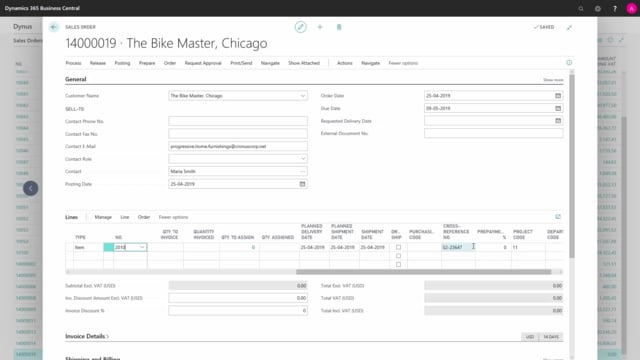
If you type your own item number, the customer’s item number fills in automatically. If you type the customer’s item number in the Cross-Reference No. field, your item number and all other item card information fill in automatically.
For items that are not set up to insert extended text automatically, you can add the extended text manually by marking the line and choosing Line, Functions, Insert Extended Texts.
Showing the Cross-Reference No. column on item lines
Before you can work with cross-reference numbers, the Cross-Reference No. column has to be visible on the item lines. Right-click on the column header and choose Columns. Find the column in the list and make sure it is marked as visible. If it isn’t, mark it and press OK.
Using your own item number to fill in the customer’s number
When a customer calls to buy an item and you type in your own item number, the customer’s item number is automatically inserted on the line. This works because the customer’s item number is set up on the item card and stored as the cross-reference number.
Using the customer’s item number to fill in yours
Cross-references work both ways. If the customer only knows their own item number, you can type that number directly into the Cross-Reference No. field. Business Central then fills in your item number on the line, along with all other information from the item card. You don’t need to know your own number to create the line.
Adding extended text to an item line manually
Some customers order items they don’t usually buy, and those items may have extended texts attached. First, add the item to the lines as normal.
If the item isn’t set up to insert extended text automatically, you can still add it. Mark the line, choose Line, Functions, and then Insert Extended Texts. An extra text line is added to the document.
Setting up an item to insert extended text automatically is covered separately, but the manual method is useful when you know the text exists and want it on a specific document.
Q&A
What is a cross-reference number in Business Central?
It is the customer’s own item number stored on the item card. It lets you and your customer order items using their numbering instead of yours, with automatic translation between the two on the sales line.
How do I make the Cross-Reference No. column visible on item lines?
Right-click on the column header, choose Columns, find the Cross-Reference No. column in the list, and make sure it is marked as visible. If it isn’t, mark it and press OK.
Do cross-references work in both directions?
Yes. If you type your own item number, the customer’s number fills in automatically. If you type the customer’s item number into the Cross-Reference No. field, your item number and all other item card information fill in automatically.
How do I add extended text to a line when it isn’t inserted automatically?
Add the item to the line, mark the line, then choose Line, Functions, Insert Extended Texts. This adds an extra text line to the document.