
The pick worksheet in Microsoft Dynamics 365 Business Central lets you control how warehouse picks are created when you process warehouse shipments. You first import the shipment lines from your source documents, then use the Create Pick function to split the work into separate pick documents.
You can split picks per warehouse document, per customer or vendor, per item, per zone, or per bin. You can also split by due date on the source document.
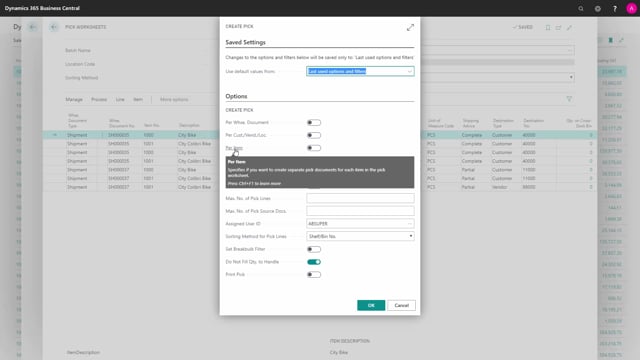
You can limit each pick by setting a maximum number of pick lines and a maximum number of source documents. You can assign a pick to a specific user ID and choose the sorting method directly in the Create Pick dialog.
Importing shipment lines into the pick worksheet
When you work with warehouse shipments that are ready to be picked, you start in the pick worksheet. In a typical scenario you might have several warehouse shipments ready at once. From the process menu in the pick worksheet, you select the warehouse documents you want to import.
This imports all the shipment lines from the source documents that are ready to be transferred to pick documents. Depending on your warehouse activity, that could be a handful of lines or it could be hundreds or even thousands.
Creating picks and choosing how to split them
Once the lines are imported, you use the Create Pick function from the process menu. This is where you decide how the work is divided into individual pick documents, and you have several options to choose from.
You can create one pick per warehouse document. If you have two different warehouse documents in the worksheet, the system splits the work into two separate warehouse picks.
You can create picks per customer or vendor. This is useful when you have many lines imported and want to group the picking by who the goods are going to, including vendors with return orders.
You can split per item. This works well for high-running items, where it makes sense to do a single pick that collects items for many different shipments at the same time.
You can split per zone or per bin. In a large warehouse, this keeps each picker working in one part of the building instead of running back and forth across the whole warehouse.
You can also split per due date on the source document, so the most urgent shipments are picked first.
Setting limits on pick size and source documents
Beyond the split criteria, you can set practical limits on each pick.
You can enter a maximum number of pick lines. This reflects how much a warehouse employee can realistically handle on a single pick, whether they are picking onto a truck, a pallet, a box, or whatever they use. You set the line quantity that fits your operation.
You can also set a maximum number of source documents per pick. For example, if you are picking into boxes on a pallet and you want to open four boxes at a time, you set the source document limit to four. The pick is then divided so each pick fills those boxes.
Assigning the pick and choosing a sorting method
You can assign a user ID directly in the Create Pick dialog, so the pick goes straight to the right colleague. You can also choose the sorting method that determines the order the pick lines appear in.
When you have set the criteria you want, you press OK and Business Central creates the picks based on those settings. In a scenario with two warehouse documents, creating one pick per document gives you two picks.
Q&A
How do you import shipment lines into the pick worksheet?
Open the pick worksheet and use the process menu to select the warehouse documents you want to import. This brings in all the shipment lines from the source documents that are ready to be transferred to pick documents.
What options do you have for splitting picks in the pick worksheet?
You can split picks per warehouse document, per customer or vendor, per item, per zone, per bin, or per due date on the source document.
How do you limit the size of each pick?
Enter a maximum number of pick lines to match what a warehouse employee can handle in one go. You can also set a maximum number of source documents per pick, for example if you want to pick into a fixed number of boxes on a pallet.
Can you assign a pick to a specific employee?
Yes. You can assign a user ID directly in the Create Pick dialog so the pick goes to a specific colleague. You can also choose the sorting method for the pick lines in the same dialog.
When should you split picks per item?
Splitting per item works well for high-running items. It lets you do a single pick that collects one item for many different shipments at once.