
When you run warehouse management and production at the same time, you regularly end up with component items that need to go back on inventory. Maybe you consumed less than expected on a production order, or you moved more components into production than you actually used. Getting those items back onto the right bin works differently depending on how your location is set up, and the right method can save your warehouse staff a lot of guesswork.
This article walks through the practical options in Business Central for moving leftover production components back into inventory, both on an advanced location without directed put-away and pick, and on a full WMS location with directed put-away and pick.
On a location that uses directed put-away and pick, you have three options for moving leftover components back to inventory. You can use the item reclassification journal, a movement worksheet, or an internal put-away. The internal put-away is usually the best choice because you only enter where to take the item, and Business Central suggests where to place it based on your bin content setup.
On an advanced location without directed put-away and pick, you create an internal movement, which then generates an inventory movement document for your warehouse staff to register.
If you want full manual control, the movement worksheet lets you create a warehouse movement yourself, but you have to tell the system where to place the item.
The starting point: components left on the production bin
Take item 1251 as an example. Looking at the bin content on the item card, the item exists in two places. On location Main, bin 120 (the production bin) holds 12 pieces. On location WMS Center, which is a directed put-away and pick location, there are 8 pieces left.
In both cases the goal is the same: move the remaining quantity back into bin 11.06, which is the main bin for storing the item.
Moving items back on an advanced location without directed put-away and pick
On the Main location, which is an advanced location but does not use directed put-away and pick, you start by creating an internal movement. From the internal movement you can then create a movement that brings the item back into inventory.
This step is only necessary if you are not using the item reclassification journal directly with the relevant bin codes. The reclassification journal is the shortcut if you just want to post the move without a physical handling document.
If you want a document for your warehouse staff to act on, create a new internal movement. You enter the two bin numbers, the location code, the item number, and the quantity. You specify both the from bin (where to pick it) and the to bin (where it should go).
From there you create the inventory movement. The result is a document your warehouse people use to take 12 from one bin and place 12 in the other, and then register the movement. Registering the movement posts the move on the Main location.
Moving items back on a WMS location with directed put-away and pick
On the WMS location, which uses directed put-away and pick, you have two ways to do the same thing.
Option 1: Manual movement via the movement worksheet
The first option is to create the movement manually from a movement worksheet. You enter the item number and the from-bin number. If you do not know where to place the item, you can leave the to-bin empty, enter the quantity, and create the movement directly.
Because this is a directed put-away and pick location, the system creates a warehouse movement with a take action and a place action. The catch is that you still have to tell the system where to place the item when you register the movement. Your warehouse staff figure out the destination bin themselves.
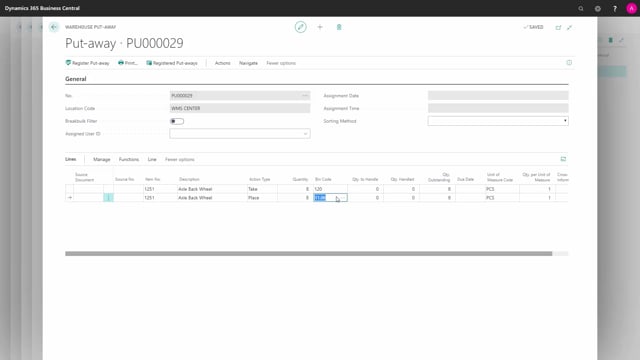
Option 2: Internal put-away with automatic bin suggestion
The second option, and the one that does the most work for you, is the internal put-away. This only applies to warehouses with directed put-away and pick.
Here you only say where to take the item. You create a line with the quantity and no bins, then let the system create the put-away. The result is a warehouse put-away document for your warehouse staff.
When you open the put-away, it has created both a take line and a place line. The difference is that it also suggests where to place the item, based on your bin content table and where the item already exists in the warehouse. You then register the put-away like any normal warehouse activity.
This is the practical advantage of the internal put-away: it handles the logic of finding the right bin automatically, so your warehouse staff do not have to decide where to store the returned components.
Choosing the right method
The method you use comes down to your location setup and how much control you want to hand to Business Central:
- Advanced location without directed put-away and pick: use the item reclassification journal for a direct posting, or an internal movement when you want a handling document.
- WMS location with directed put-away and pick, manual control: use the movement worksheet, but be ready to specify the placement bin yourself.
- WMS location with directed put-away and pick, automatic placement: use the internal put-away and let the system suggest the destination bin.
Q&A
How do I move leftover production components back to inventory in Business Central?
It depends on your location setup. On an advanced location without directed put-away and pick, use the item reclassification journal or create an internal movement. On a WMS location with directed put-away and pick, use a movement worksheet or, preferably, an internal put-away that suggests the destination bin for you.
What is the difference between an internal movement and an internal put-away?
An internal movement is used on advanced locations without directed put-away and pick, and you specify both the from bin and the to bin. An internal put-away only applies to locations with directed put-away and pick, and you only specify where to take the item. The system then suggests where to place it based on your bin content setup.
Why should I use an internal put-away instead of a movement worksheet?
With a movement worksheet you still have to tell the system where to place the item when registering the movement. The internal put-away suggests the destination bin automatically based on your bin content table and where the item already exists, so your warehouse staff do not have to decide where to store the returned components.
Can I move component items back to inventory without a handling document?
Yes. On an advanced location you can use the item reclassification journal directly with the relevant bin codes to post the move without creating a physical handling document for your warehouse staff.